Organizations prefer Cisco data center solutions as their IT infrastructure requirements. In these solutions, Cisco nexus port channel and switches play an important role in providing high performance traffic forwarding and ensuring reliability and scalability.
In order to make you understand the ether-channel configuration on these switches, I have created the above scenario. These lab tasks referred from a cisco nexus workbook lab guide, it covers several other lab tasks which you can implement on Cisco nexus 9k switches.
I performed all these practical on a remote lab. However you can also perform the tasks on your own home made lab ( It requires minimum resources of 6vCPU and 24 GB RAM).
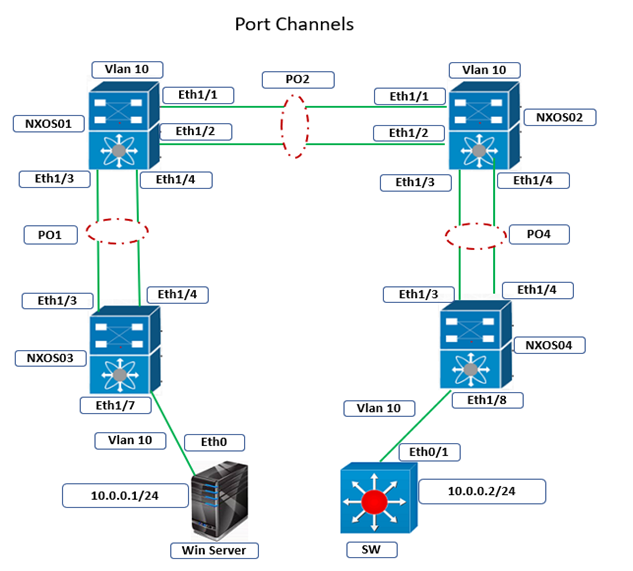
Before proceed to the actual lab tasks configurations, please create a similar topology as given above in your lab or remote cisco nexus virtual lab and configure switches step by step. So here we go.
Lab Tasks - Cisco Nexus Port Channel
1. Erase the previous configuration on switches NXOS01, NXOS02, NXOS03 and NXOS04 using command “write erase” and reload both switches, assign hostname the same hostname to both switches. Use provisioning documents if required
2. Configure port channels between NXOS01, NXOS02, NXOS03, and NXOS04 as follows:
● The links between NXOS03 and NXOS01 should be grouped together in Port-Channel 1. Do not use a negotiation protocol for this channel.
● The links between NXOS01 and NXOS02 should be grouped into Port-Channels 2. Both switches should initiate LACP negotiation and use LACP fast timers.
● The links between NXOS04 and NXOS02 should grouped together into Port-Channel 4. NXOS02 should initiate LACP negotiation and NXOS04 should respond.
● Disable all other interconnections between the switches.
3. Configure all cisco nexus port channels as 802.1Q trunk links. Create VLAN 10 on all switches.
4. Configure Cisco nexus switch NXOS02 with an LACP priority of 16384 so that it is the preferred device for managing negotiation of its port channels.
5. Configure all switches to use source and destination TCP/UDP ports for load balancing flows across the port channel members.
6. Configure NXOS03’s link to Win Server and NXOS04’s link to SW in VLAN 10.
7. Win Server should use the IP address 10.0.0.1/24 and SW should use the IP address 10.0.0.2/24. When complete, Win Server and SW should have IP reachability to each other.
8. Keep saving your configuration using command “copy run start”
Port Channel Configuration on Cisco Nexus 9000 Switches
NXOS03:
#First, enable lacp feature and configure port channel on nexus 9000 switch (NXOS03) on interfaces connected to NXOS01. feature lacp |
NXOS04:
#Second, enable lacp feature for etherchannel and configure port channel on nexus NXOS04 on interfaces connected to NXOS02. feature lacp ! vlan 10 |
NXOS01:
#Third, enable lacp feature and configure two separate port channels on nexus NXOS01 on interfaces connected to NXOS02 and NXOS03 respectively. feature lacp ! |
NXOS02:
#Fourth, enable lacp feature for etherchannel and configure two separate port channels on nexus NXOS02 on interfaces connected to NXOS01 and NXOS04 respectively. feature lacp |
SW:
#Fifth, configure an IP address on switchport connected NXOS04 on SW. hostname SW |
Verifying - Cisco Nexus LACP port channels
Port channels in NX-OS, just like in Catalyst IOS and other platforms, require that the member interfaces first have compatible parameters for the channel to form. In NX-OS, these parameters can be verified with the command show port-channel compatibility-parameters. Some of these parameters can be seen below:
NXOS01# show port-channel compatibility-parameters | include \* * port mode |
Note: – In the topologies (not related to our topology), both M series and F series modules are present, because these modules have different port level capabilities, they are not compatible to channel together. In case you try to form a port channels on these incompatible modules, the NX-OS parser will detect this and return an error message if you attempt to channel together incompatible port types, as shown below:
%ETH_PORT_CHANNEL-3-COMPAT_CHECK_FAILURE: rate mode is not compatible
command failed: port not compatible [rate mode]
After the channels are successfully formed, the show port-channel summary output should indicate that the member links are “Up in the port-channel” with flag (P). This output also shows whether LACP negotiation was used or not.
NXOS01# show port-channel summary Flags: D – Down P – Up in port-channel (members) |
NXOS02# show port-channel summary Flags: D – Down P – Up in port-channel (members) |
NXOS03# show port-channel summary Flags: D – Down P – Up in port-channel (members) |
NXOS04# show port-channel summary Flags: D – Down P – Up in port-channel (members) |
Spanning-Tree Protocol sees port channels as one logical link, as shown below. Separate channels that point the same direction in the spanning-tree in rapid pvst, such as Port-Channels 1 and 2 below, are still subject to the normal forwarding and blocking rules.
NXOS01# show spanning-tree vlan 10 VLAN0010 |
In Cisco nexus port channel, LACP neighbors i.e. NXOS01 and NXOS02 i.e. both cisco nexus 9000 switches should see that its System Priority (the first portion of the System ID) has been reduced to a more preferred value of 16384. The Cisco etherchannel lacp output below also shows whether the neighbor is running LACP in active or passive mode, and whether slow or fast LACP hellos are being used. In ACI mode, management configurations happens on a centralized device called APIC wherein you need not to worry about priority, lacp etc. in port channel.
NXOS01# show lacp neighbor interface Po2 Flags: S – Device is sending Slow LACPDUs F – Device is sending Fast LACPDUs |
To verify the configured load balancing method of the switches, use the show port-channel load-balance command, as seen below.
Note that on the Nexus the load balancing method can only be changed in the default VDC, as this change is chassis-wide between all VDCs.
NXOS03# show port-channel load-balance System config: |
NXOS01# show port-channel load-balance System config: |
Configure the IP address on Win Server. Win Server and SW should have IP reachability to each other

In case you want to do hands-on practice on Cisco Nexus 9000 series switches using more labs like above. Here is the resources you can avail.
| These are Nexus Training Videos with lab. Explanation of each topics using the lab. | 30 Hours Videos and 50 hours of Remote Lab access for a month |
Related Articles:
Cisco Nexus 9k Switches Architecture
Introduction to Cisco Nexus ACI
Cisco Nexus Switch Replacement in VPC
All the very best!
Deepak Sharma, CCIE#37340
Comments (0)

Categories
Popular posts

Cisco Nexus Port Channel: Configuring ...
26 Apr 2024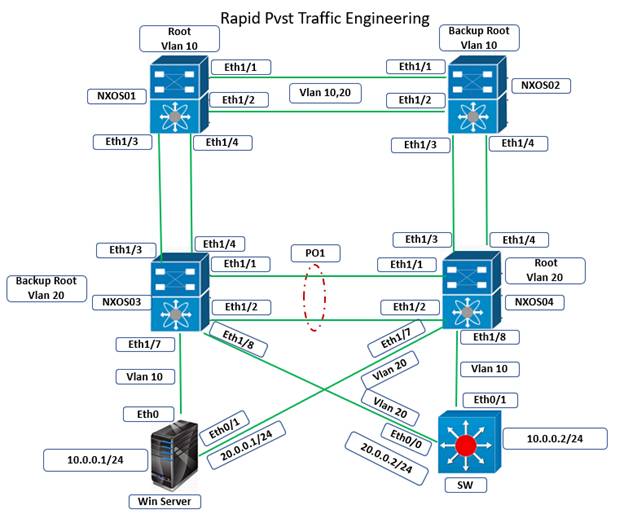
Configure Rapid PVST on Cisco Nexus
26 Apr 2024
Palo Alto Exam Cost: PCNSA, PCNSE & More
26 Apr 2024
Cisco ACI VPC Configuration Task Steps
6 Jan 2024Recent posts
Network Hardware Devices: Explained
26 Apr 2024
Configure Rapid PVST on Cisco Nexus
26 Apr 2024
Palo Alto Exam Cost: PCNSA, PCNSE & More
26 Apr 2024
Cisco Nexus Port Channel: Configuring ...
26 Apr 2024