Tasks
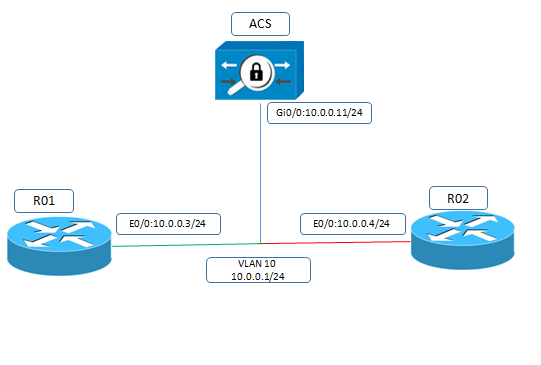
✓ Configure the IP address of R1: 10.0.0.3/2
✓ Configure the IP address of R2: 10.0.0.4/24
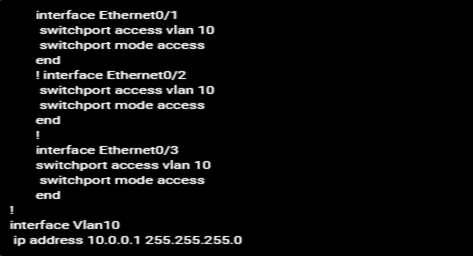
✓ Configure the Switch: Vlan 10 and put following ports in Vlan 10: eth0/1, eth0/2, eth0/0, and eth3/0. Also Configure Interface Vlan 10 on SW with IP address 10.0.0.1/24
✓ Configure the ACS with IP address 10.0.0.11/24 with username admin and password Uninets@123.
✓ Configure the R4 with Enable Secret Uninets@123
✓ Configure R4 line Vty 0-4 with transport Input all
✓ Configure R4 with username Uninets and password Uninets@123 with Privilege level 15
✓ Configure R4 so that if telnet it from R3 It will go to ACS and then Local password.
✓Configure the R4 to allow Users who are going to login via AAA with username admin and password Uninets@123 will have full authorization.
✓ Use TACACS Server Key Uninets@123
Explanation
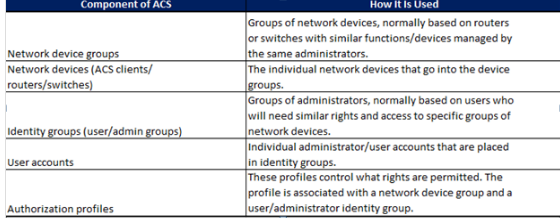
Cisco Secure ACCESS CONTROL SERVER (ACS) offers authentication, accounting, and accounting to arrange network devices. It incorporates switches, Cisco firewalls like ASA and Firepower, and system get to servers. Cisco Secure Access Control Server underpins two noteworthy AAA conventions: to be specific, TACACS+ and RADIUS.
Cisco ACS unifies authentication (your identity) as well as authorization (what you can access) and accounting (the logging of what when you signed in and out, and also what you were conceded access to). Customarily, this was simply required for dial-up clients over modem telephone lines; later, for Internet VPN clients. Be that as it may, starting with ACS variant 4.0, Cisco ACS is playing out a similar verification, approval, and bookkeeping capacities for systems that are NAC-empowered.
Configuration
Here is the switch configuration wherein assigning interfaces to their respective VLANs and configuring IP address on SVI VLAN 10
Routers Configuration
Here are the configurations on the routers, only IP addresses are assigned on the directly connected interfaces and verifying their connectivity between each other.
R01:
interface Ethernet 0/0
ip address 10.0.0.3 255.255.255.0
No shutdown
!
R02:
!
interface Ethernet0/0
ip address 10.0.0.4 255.255.255.0
No shutdown
!
R2#ping 10.0.0.1
Type escape sequence to abort.
Sending 5, 100-byte ICMP Echos to 10.0.0.1, timeout is 2 seconds:
!!!!!
Success rate is 100 percent (5/5), round-trip min/avg/max = 1/1/1 ms
R2#ping 10.0.0.1
Type escape sequence to abort.
Sending 5, 100-byte ICMP Echos to 10.0.0.1, timeout is 2 seconds:
Success rate is 100 percent (5/5), round-trip min/avg/max = 1/1/1 ms
!!!!!
PC Configuration
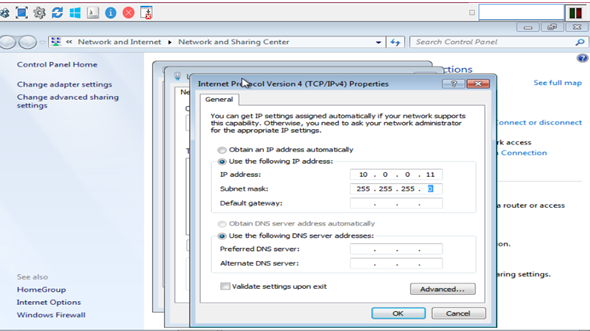
Access the WIN PC via VNC and apply the IP Address:
Configure the ACS:
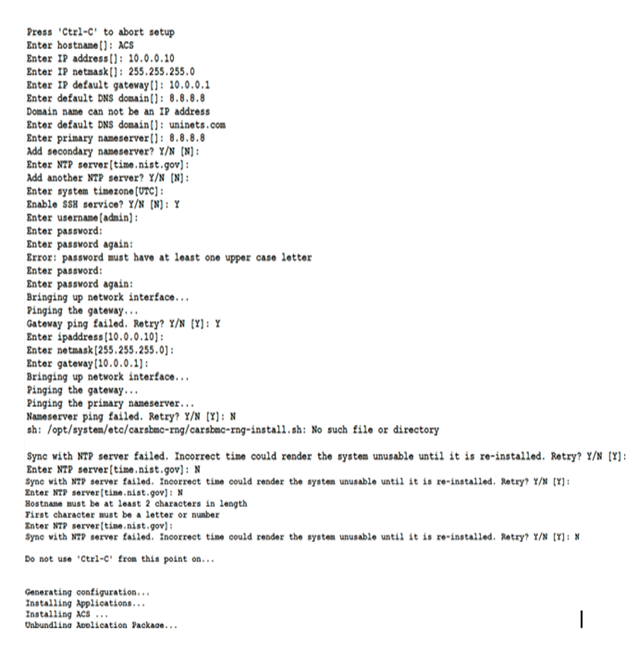
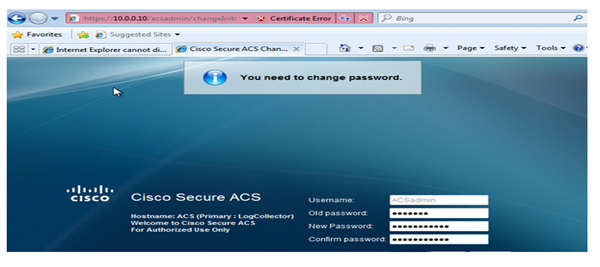
To access CLI: Username: admin, password: Uninets@123 Once done Try access to ACS via Window machine. It will ask for Username and password: Username: ACSadmin Password: default. Once done it will ask to change password: Uninets@123 and install the License to get started.
Configure the following configuration on R2:
Here we are enabling the aaa new model for authentication and authorization via TACACS server, in case tacacs is not reachable then fall back to local username which is also configured. The credentials for the tacacs server is provided and then finally allow incoming connections to get authenticated and authorized via TACACS server on VTY line.
!
aaa new-model
aaa authentication login UNINETS_TACACS group tacacs+ local
aaa authorization exec UNINETS_Exec_via_TACACS group tacacs+ local
!
username admin privilege 15 secret Uninets@123
!
tacacs-server host 10.0.0.10 key Uninets@123
!
line vty 0 4
authorization exec UNINETS_Exec_via_TACACS
login authentication UNINETS_TACACS
transport input all
!
enable secret Uninets@123
!
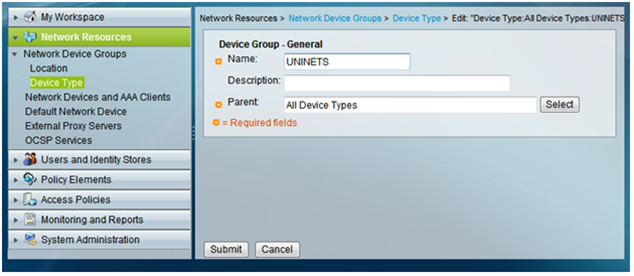
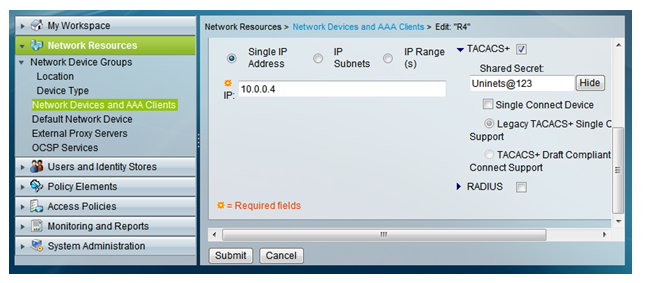
Now we have to start configuration on ACS The first step is to create a device group. You do so by navigating to Network Resources > Network Device Groups > Device Type and clicking Create
Configure the device and add it to Device Group.
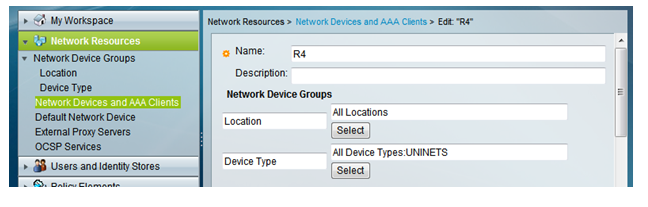
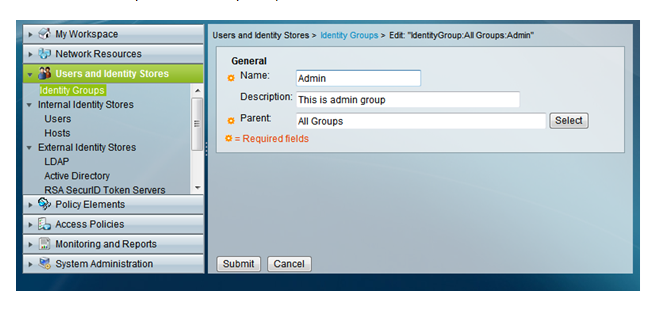
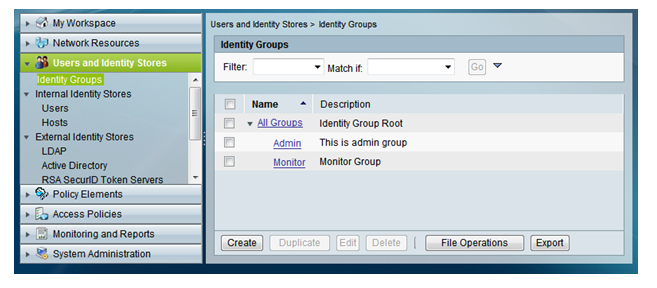
Configure users Group: So, we have created a network device group, and added router R02 as the first network device (ACS client) in this group. The next step is to create a user group, and then create some users in those groups. The group we are going to create are an Admin group. To create these groups, navigate to Users and Identity Stores > Identity Groups and Click Create,
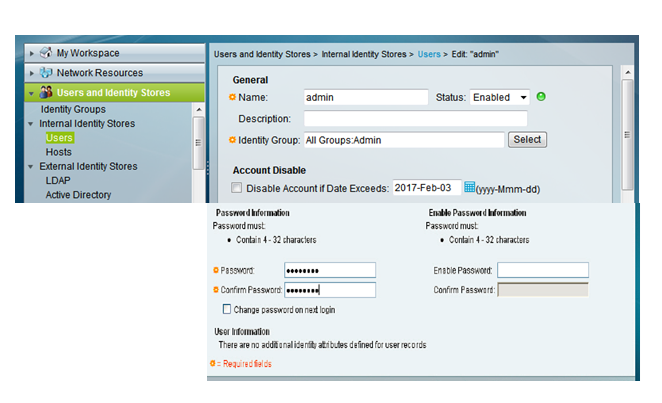
Configure users with username and password and put that user in user group: These new group have no users in them by default and have no special permissions by Default. The first step to fixing that is to create a couple user accounts and place at least one user account into each group. To create individual users, navigate to Users and IdentityStores> Internal Identity Stores > Users and click Create.
Configure the authorization policies for the user. The next step is to configure authorization policies that give full access to users in the Admin group who are trying to access routers in the network device group we created. To create and assign the reservation policies, first navigate to Access Policies > Access Services > Default Device Admin >Authorization and click Create,
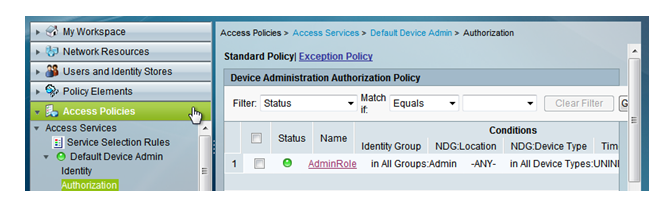
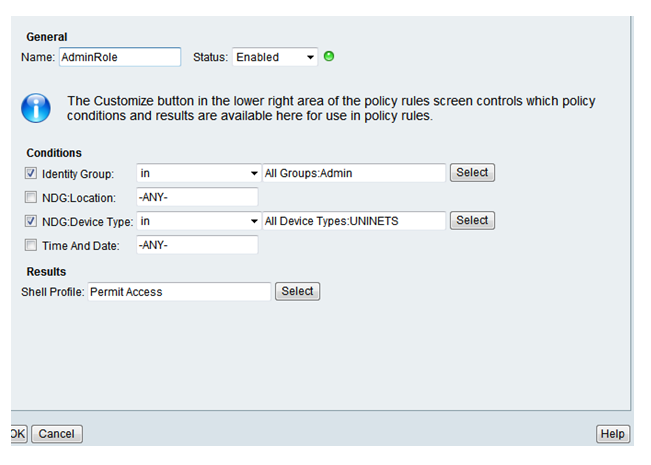
In the dialog box, indicate the name of this policy, called in this example AdminRole, and check the box next to the conditions next to identity group, and click the Select button to choose the Admin group created earlier. Use the same process, checking that box next to NDG Device Type (NDG stands for network device group) and then using the Select button, to indicate the device belongs to the group of routers device group that was created earlier.
This is setting up a condition so that if a user who is a member of the Admin group is attempting to access a device that is a member of the specific router group, then as a result we can provide specific access based on a custom shell profile that we can create. To do that, click the Select button next to the Shell Profile option, and you are presented with the Screen shown,
Verification: - Now for testing login to R01 and telnet 10.0.0.4, it will ask for username and password, Supply it with username admin and password Uninets@123
R01#telenet 10.0.0.4
Trying 10.0.0.4 … Open
Username: admin
Password:
R02>en
Password
!
Wrap-up Time, Friends, we hope this post will help you to get best answer for your topic related queries.
Comments (0)

Categories
Popular posts

Cisco Nexus Port Channel: Configuring ...
26 Apr 2024
Configure Rapid PVST on Cisco Nexus
26 Apr 2024
Palo Alto Exam Cost: PCNSA, PCNSE & More
26 Apr 2024
Cisco ACI VPC Configuration Task Steps
6 Jan 2024Recent posts
Configure Rapid PVST on Cisco Nexus
26 Apr 2024
Palo Alto Exam Cost: PCNSA, PCNSE & More
26 Apr 2024
Cisco Nexus Port Channel: Configuring ...
26 Apr 2024
Types of Network Topology: Explained
25 Apr 2024