Tasks
1. Create Interface Policies with CDP enable, LACP Enable, Port Speed 10 G
2. Create Interface Policies Groups and Interface Profiles with Port 1/31 and 1/32 on Both Leaf
3. Configure VPC so that Both ESxi can be connected to Leaf and ACI
Task 1: Create Interface Policies with CDP enable, LACP Enable, Port Speed 10 G
Complete these steps:
Step 1 Open Chrome Browser and login to APIC.
Step 2 Choose Fabric “Access Policies “select Access Policies.
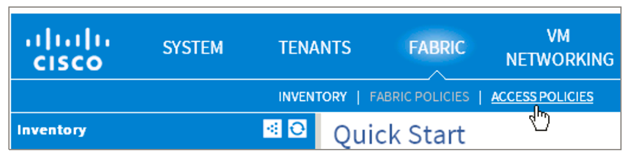
There are two types of policies under fabric.
Fabric policies configure interfaces that connect spine and leaf switches. Fabric policies can enable features such as monitoring (statistics collection and statistics export), troubleshooting (on-demand diagnostics and SPAN), or NTP.
Access policies configure external-facing interfaces that do not connect to a spine switch.
External-facing interfaces connect to external devices such as virtual machine controllers and hypervisors, hosts, routers, or fabric extenders (FEX). Access policies enable configuring port channels and virtual port channels, protocols such as LLDP, CDP orLACP, and features like monitoring or diagnostics.
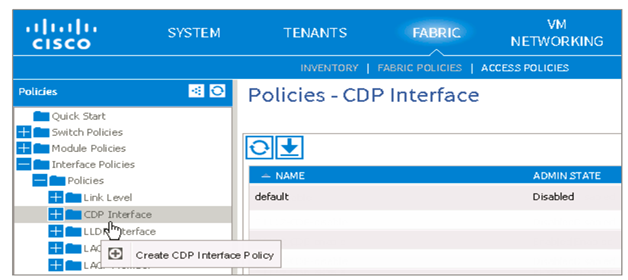
Step 3 Select Interface Policies “expand Policies.
Interface policies are used for single or multiple interfaces, port-channels, and virtual port-channels (vPC). Each will create unique policies for your respective tenant.
Step 4 Right-click CDP Interface “Create CDP Interface Policy. Name: Txx-CDP-Enable Admin State: Enabled “Submit
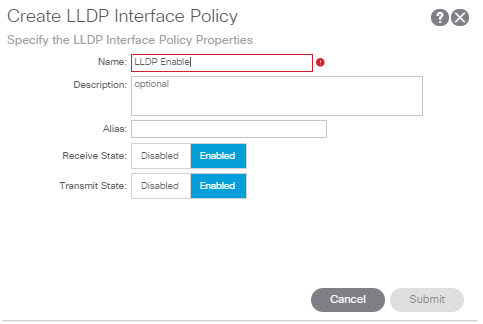
Step 5 Create a policy to enable LLDP (Link Layer Discovery Protocol). Right-click LLDP Interface “Create LLDP Interface Policy
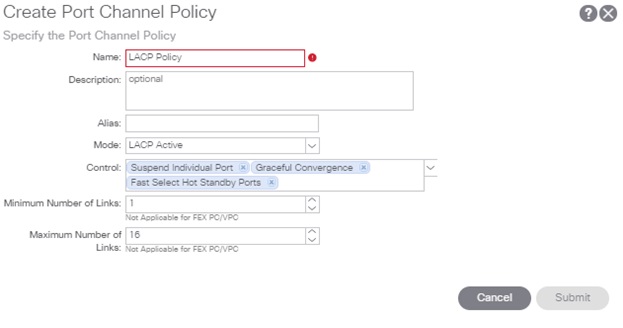
Step 6 To create a policy for Link Aggregation Control Protocol (LACP), right-click Port-Channel > Create Port-Channel Policy
Name: LACP-PolicyMode: Active
Task 2: Create Interface Policies Groups and Interface Profiles with Port 1/31 and 1/32 on Both Leaf
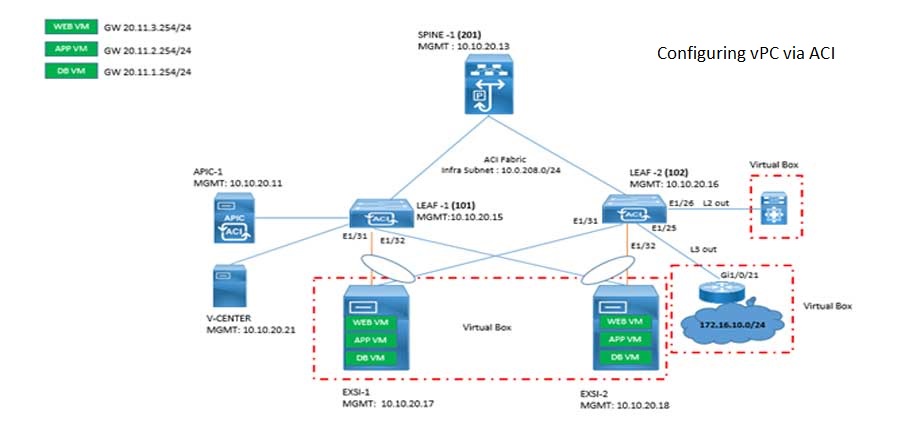
In this task, you will create vPC Interface Policy Group for your assigned connection to the ESXi. Each tenant will create a vPCfrom the ACI fabric to ESXi-Aand then a second vPC to ESXi-B. Use the interfaces assigned to your tenant in topology
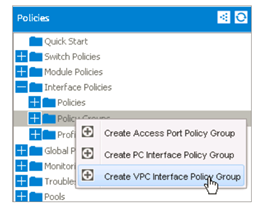
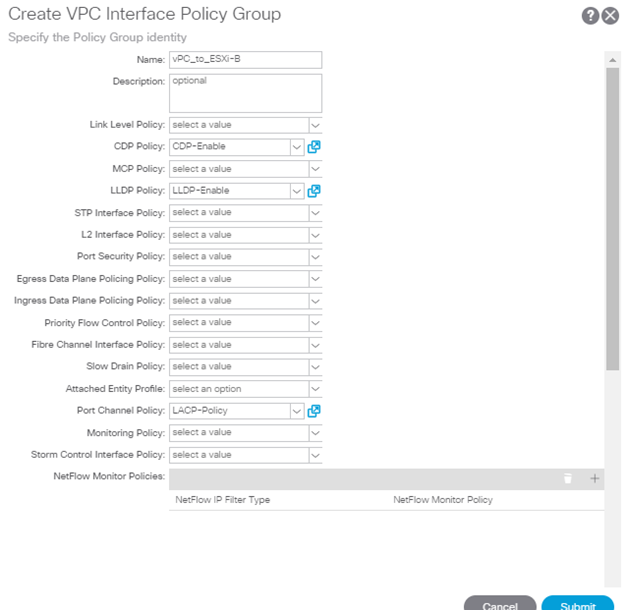
Step 1 Choose Fabric > Access Policies > Interface Policies.Right-click Policy Group > Create VPC Interface Policy Group
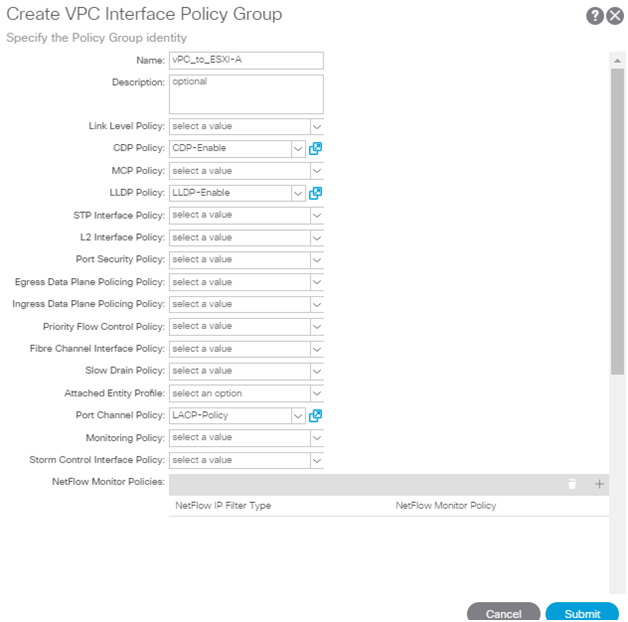
Step 2 In the dialog, enter the information as follows:
Name: vPC_to_ESXI-A (from table at beginning of the task)
CDP Policy: CDP-enable (created in previous task)
LLDP Policy: LLDP-enable (created in previous task)
LACP Policy: LACP-Policy (created in previous task)
Step 3 Repeat the process to create a VPC Interface Policy Group to connect to ESXi-B
Name: vPC_to_ESXi-B (from table at beginning of the task)
CDP Policy: CDP-enable (created in previous task)
LLDP Policy: LLDP-disable (created in previous task)
LACP Policy: LACP-Policy (created in previous task)
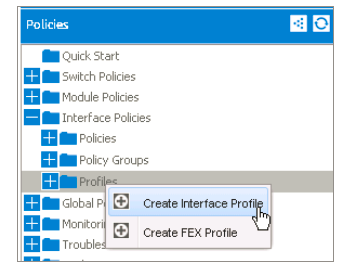
Step 4 Create an Interface Policy Profile to specify the specific Ethernet interfaces assigned to your Tenant’s connection to Both Esxi
.Fabric > Access Policies > Interface Policies| Right-click Profiles > Create Interface Profile
Step 5 Enter name ESXi-A-if-profile and select the [+] adjacent Interface Selectors.
Port Selector name: Port1/31, Interface IDs: 1/31
Interface policy group: vPC_to_ESXi-A (created earlier)

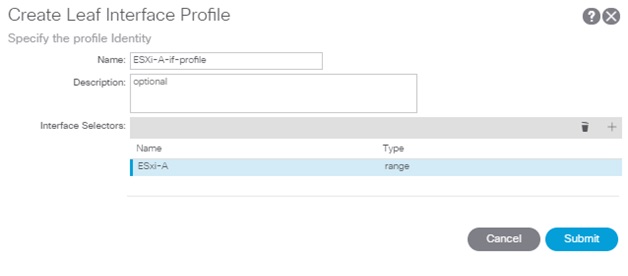
Step 6 Click OK > Submit
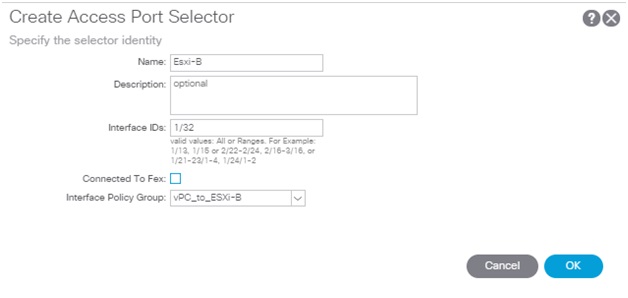
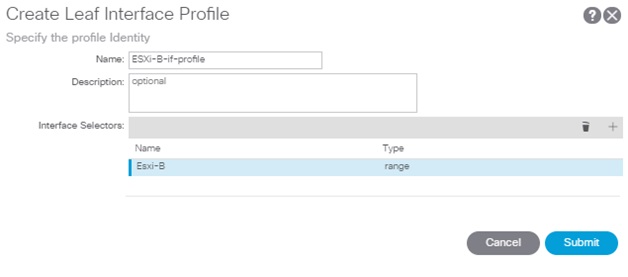
Step 7 Enter name ESXi-B-if-profile and select the [+] adjacent Interface Selectors.
Port Selector name: Port1/32, Interface IDs: 1/32
Interface policy group: vPC_to_ESXi-B (created earlier)
Step 8 Create a profile to select the leaf switches where the ESXi-A and ESXi-B are connected.
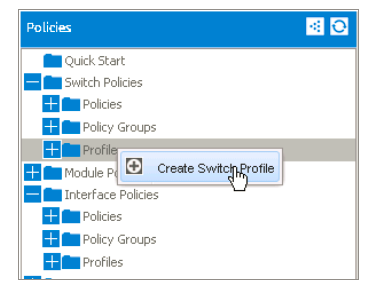
Select Fabric > Access Policies > Switch Policies | Right-click Profiles > Create Switch Profile
Step 9 In the dialog, enter name L101-L102-SwitchProfile and Select the [+] adjacent Switch Selectors:
Name: L101-L102-SwitchSelector
Blocks: select both Leaf101 and Leaf102

Step 10 Click Update > Next.
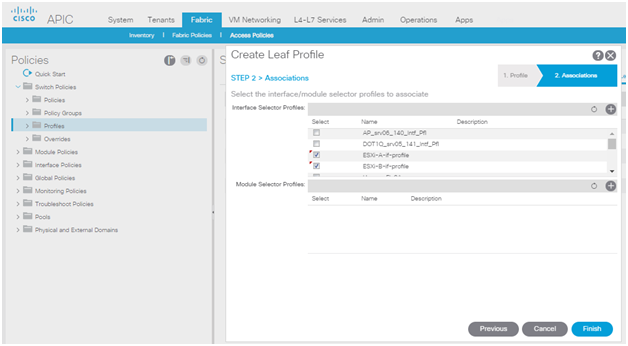
Step 11 Locate and check your Tenant’s Interfaces Selector Profiles created earlier.
Selct the both Profil
ESXi-A-if-profile
ESXi_B-if-profile
Task 3: Configure VPC so that Both ESxi can be connected to Leaf and ACI
Creating VPC Explicit Protection Group
In the previous sections, we have created all the elements needed to build a VPC – or in this case 2 VPCs. One towards ESXi-A and another towards ESXi-B. We will now create the actual VPC and tie the elements together.
We will start by creating a “VPC Explicit Protection Group”. It’s basically the ACI way of saying “VPC Domain ID”.
Click “Fabric”
Click “Access Policies”
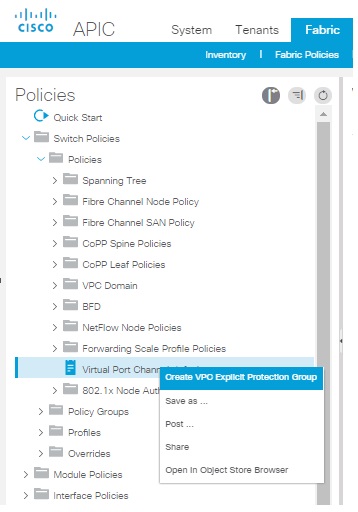
Expand “Switch Policies”
Expand “Policies”, select “Virtual Port Channel default” then right-click and choose “Create Explicit Protection Group”
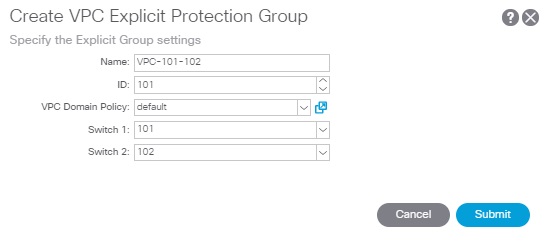
A pop-up window will appear to create an Explicit Protection Group
In the “Name:” field, type “VPC-101-102”
In the “ID:” field, type “101”
In the “VPC Domain Policy” field, click the drop-down and choose “default”
In the “Switch 1:” field, click the drop-down and choose “101”
In the “Switch 2:” field, click the drop-down and choose “102”
Click “Submit"
Comments (0)

Categories
Popular posts

Cisco Nexus Port Channel: Configuring ...
22 Apr 2024
Configure Rapid PVST on Cisco Nexus
5 Apr 2024
Palo Alto Exam Cost: PCNSA, PCNSE & More
28 Mar 2024
Cisco ACI VPC Configuration Task Steps
6 Jan 2024Recent posts
Network Hardware Devices: Explained
24 Apr 2024
CCNA Course Syllabus: Topics Explained
23 Apr 2024
AWS Certification Path: Amazon Cloud
23 Apr 2024
Cisco Nexus Port Channel: Configuring ...
22 Apr 2024