Task
On Bigip-1 create a virtual server vs_Https 172.16.100 with destination ip as 172.16.100.2 at portno. 80 and enable the http profile and select the default ssl profile on clinetssl side select the default pool as pool http and verify the ssloffloading behavior.
On Bigip-1, also enable the server side ssl profile as the server ssl now the virtual server has both cliient and server side ssl default profile enable now verify it.
On Bigip-1 create a custom self-signed certificate with name cert_custom and then create a custom ssl client profile with name custom client and call that custom certificate in this new ssl client profile and apply this profile on the vs_https
Configuration
Start the workstation and open it and open the browser and get the access of the Big-ip 1 using https to the management IP address and as shown below. When you will click on login following home page will appear.

Now create a new virtual server with name VS_Https with destination ip address-172.16.100.2 and made it to listen at port no. 443 for it. Click on virtual servers as shown below!
As soon as you will click on virtual server the following page will open showing the virtual server list as shown below:
Now create a new virtual server with name VS_Https with destination ip address-172.16.100.2 and made it to listen at port no. 443 for it click on create as soon as you will click on create following page will open:
Now into the configuration section select the http profile and select the ssl client (default profile) from available to select.
Now scroll down and select the default pool as pool http as shown below and click on finished.
As soon as you will click on finished the virtual server vs_https is show in the list of created virtual server.
Now generate the https traffic from the browser and first clear the history, cache and cookie of your browser
When you generate the https traffic you will get the error message because of self-signed certificate which your browser does not found trusted. So click on continue.
As soon as you will click on continue the following page will open. Now you can verify using the cli the ssl offload behavior as shown below:
[root@bigip-1:Active:Standalone] config # tmsh
root@(bigip-1)(cfg-sync Standalone)(Active)(/Common)(tmos)# show sys connection
Really display all connections? (y/n) y
Sys::Connections
172.16.100.115:50402 172.16.100.2:443 172.16.100.115:50402 172.16.11.4:80 tcp 78 (tmm: 0) none
172.16.100.115:50396 172.16.100.2:443 172.16.100.115:50396 172.16.11.4:80 tcp 87 (tmm: 0) none
Total records returned: 2
you can see from above connection table entry the client side connection is at port no. 80 and server side connection connection is plain text at port no. 80 and can also verify the virtual server settings using CLI
Root@(bigip-1)(cfg-sync Standalone)(Active)(/Common)(toms)# list ltm virtual vs_https
ltm virtual vs_https {destination 172.16.100.2:https ip-protocol tcp mask 255.255.255.255 pool pool_http profiles {clients’ {context client side } tcp { }
source 0.0.0.0/0 translate-address enabled translate-port enabled vs-index 49}
Now we have already done the ssl offloading using the default ssl profile and now you can also configure the custom ssl client profile.
Comments (0)

Categories
Popular posts

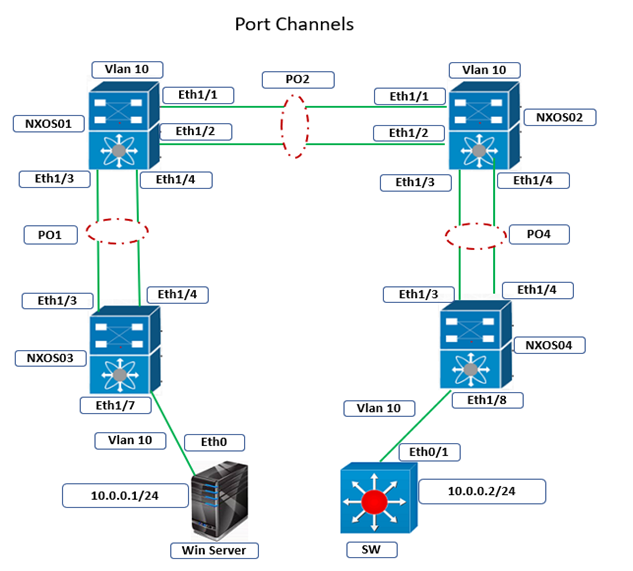
Cisco Nexus Port Channel: Configuring ...
4 Apr 2024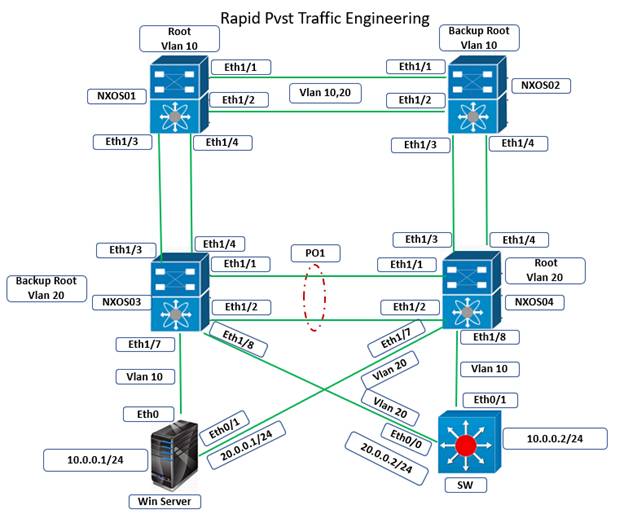
Configure Rapid PVST on Cisco Nexus
5 Apr 2024
Palo Alto Exam Cost: PCNSA, PCNSE & More
28 Mar 2024
What is SNAT in F5 LTM: Basic Concepts
6 Jan 2024Recent posts

AWS Certification Path: Amazon Cloud
18 Apr 2024
SD-WAN Vendors Comparison: Choosing the ...
16 Apr 2024
CCNP Certification Cost and Exam Fees
12 Apr 2024
Configure Rapid PVST on Cisco Nexus
5 Apr 2024