Step1. Create object group for the interface used by SNMP server to poll the device. In this example we use the IP address of management interface. We have given the name snmp-Interface to management interface. It is basically a IP to name mapping.
Nexus-switch (config) # object-group ip address snmp-Interface
Nexus-switch (config-ipaddr-ogroup) # host 192.168.1.1
Step2. Configure access list to allow snmp communication between server and device. Source will be SNMP server IP address and destination is management interface address.
For simplicity, I have used the IP in access list; you can specifically allow the snmp ports between server and device. If you allow specific ports, please make sure that trap port (UDP 162) must also be opened.
Access list for read only servers:
Nexus-switch (config) # ip access-list Readonly-snmp-traffic
Nexus-switch (config-acl) # permits ip 10.1.1.20/32 addrgroup snmp-Interface
Access list for write servers:
Nexus-switch (config) # ip access-list Readwrite-snmp-traffic
Nexus-switch (config-acl) # permit ip 10.1.1.20/32 addrgroup snmp-Interface
Step3. Configure Read only community
Nexus-switch (config) # snmp-server community CISCORO group network-operator
Step4. Configure Read write community
Nexus-switch (config) #snmp-server community CISCORW group network-admin
Step5. Configure access list for snmp communities.
Nexus-switch (config) #snmp-server community CISCORO use-acl Readonly-snmp-traffic
Nexus-switch (config) #snmp-server community CISCORW use-acl Readwrite-snmp-traffic
Step6. Configure the SNMP trap source address. SNMP server will receive traps with source interface mgm0. SNMP server will convert the traps to alert only if it has the correct MIB in its database.
Nexus-switch (config) # snmp-server source-interface traps mgmt. 0
Step7. Enables the EIGRP traps (Authentication and SIA).
Nexus-switch (config) # snmp-server enable traps eigrp
Step8. Enable Link down traps.
Nexus-switch (config) # snmp-server enable traps link linkdown
Step9. Enable traps when HSRP state changes.
Nexus-switch (config) # snmp-server enable traps hsrp state-change
Step10. Enables traps for FAN status change.
Nexus-switch (config) # snmp-server enable traps entity entity_fan_status_change
Step11. Enable traps for module status change.
Nexus-switch (config) # snmp-server enable traps entity entity_module_status_change
Step12. Enable traps for unrecognised module
Nexus-switch (config) # snmp-server enable traps entity entity_unrecognised_module
Step13. Device will send the traps to server 10.1.1.20.
Nexus-switch (config) # snmp-server host 10.1.1.20 traps CISCOTRAPS
Comments (0)

Categories
Popular posts

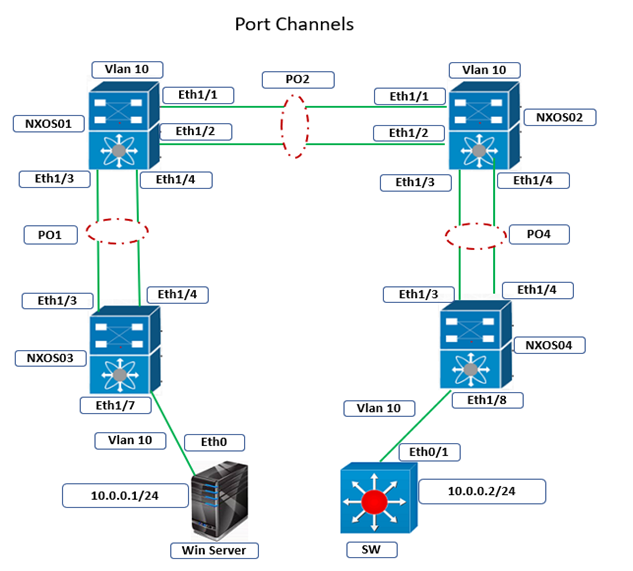
Cisco Nexus Port Channel: Configuring ...
4 Apr 2024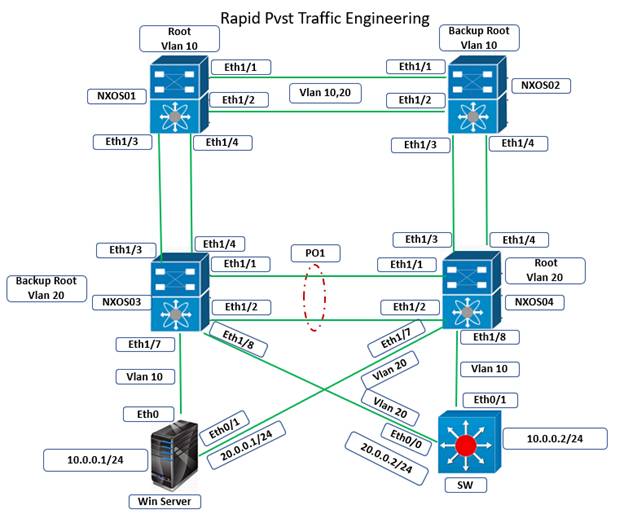
Configure Rapid PVST on Cisco Nexus
5 Apr 2024
Palo Alto Exam Cost: PCNSA, PCNSE & More
28 Mar 2024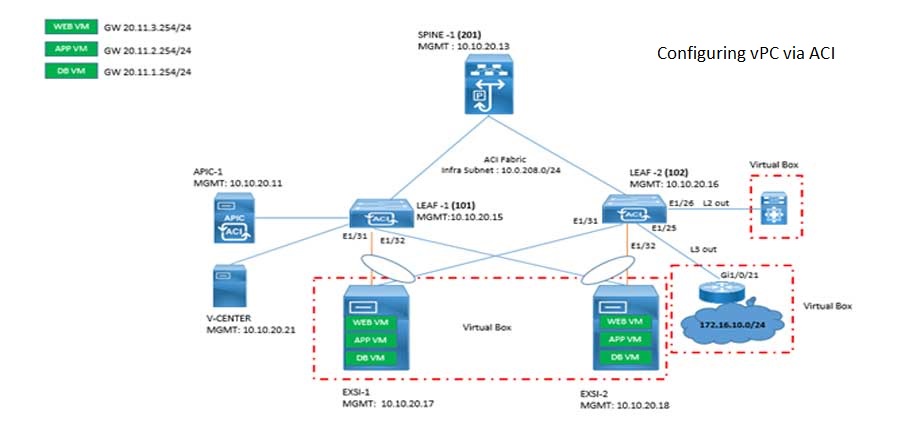
Cisco ACI VPC Configuration Task Steps
6 Jan 2024Recent posts

AWS Certification Path: Amazon Cloud
18 Apr 2024
SD-WAN Vendors Comparison: Choosing the ...
16 Apr 2024
CCNP Certification Cost and Exam Fees
12 Apr 2024
Configure Rapid PVST on Cisco Nexus
5 Apr 2024